 I made these cards using the Scrapping for Less December card kit. This was a combination winter-themed and Valentine’s Day kit complete with adorable stamps and papers. Please let me know in the comments if you’d like information on the specific items from the kit.
Equipment:
Scrapping for Less Card Kit (This specific kit is sold out. They release kits every month and it is well worth the low price!)
Tim Holtz Distress Oxide Ink in Worn Lipstick
Lawn Fawn Large Stitched Rectangles Dies
Pink & White Baker’s Twine (I don’t remember which brand I used, so I linked to something similar.)
Michaels Recollections Brand Red Cardstock
Jewels (The ones I used came in a card kit that’s no longer available, so I’ve linked to something very similar.)
The Idea(s):
I wanted to create a couple of Valentine’s Day cards using the collections in my December Scrapping for Less card kit. The papers were cute and I had a brand new My Favorite Things Die-Namics Blueprints 27 to try out. My goal was to make cards without having to color anything and with a minimum of stamping.
What I Did:
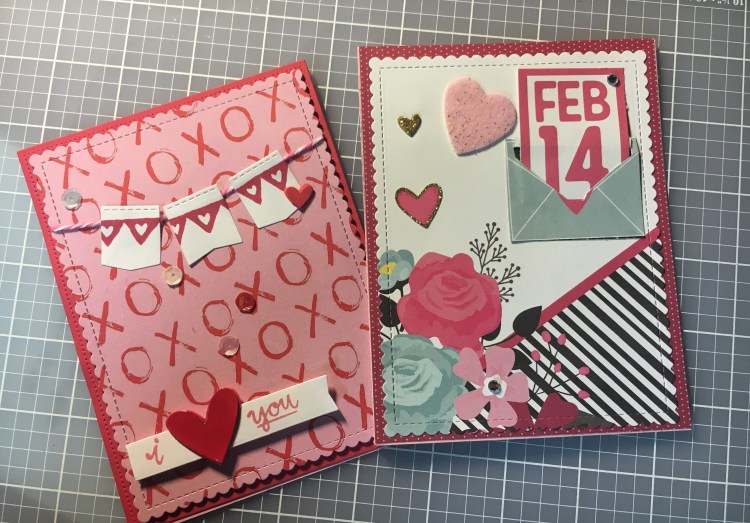
Card #1 
I started out by choosing using a stitched rectangle die to cut out a piece of red paper from my stash. I then chose the pink XOXO paper from the collection. I cut that out using the MFT Blueprints scalloped stitched rectangle die. At the Banana Split level of the Scrapping for Less card kit, you get an extra die or stamp set. The extra in December’s kit was a stamp set from Main Squeeze that had an adorable heart border and the “i heart you” sentiment. Only “heart” was the actual word. Because the sentiment came as three separate words, I decided to just use the “I” and “you” and die cut an actual little heart to put in the middle.
The same paper I used as the background I used to cut out a bunch of little hearts. I used some craft foam to give them a little bit of dimension, although to be honest I’m not sure it made that much of a difference. I ran the hearts through my Xyron Create-a-Sticker and set them aside.
I then stamped the red heart border in Lawn Fawn Lobster Ink on white card stock from my stash and used another die from the Blueprints Die-namics to cut out three banner pieces. The baker’s twine came in the card kit as well, and I attached the banner pieces to the piece of twine with glue dots and adhered them to the scalloped panel. I wanted the twine to look like it was sagging a little from the weight of the banner, so I made sure to attach the ends on the back at a slight angle.
I then stamped out the sentiment in Distress Oxide Worn Lipstick, cut it out with a banner die from the Blueprints set (Can you tell I love the Blueprints?), and popped it up on some foam tape. I added one other heart “sticker”, some sequins from the kit collection, and then decided to add Glossy Accents to the main sentiment heart.
Card #2

My goal for this card was to do absolutely NO stamping and to use the tiny page of sentiment squares that came in the paper collection as well as the embellishments. One of the squares had an envelop on it, so I cut out the envelop and then used a craft knife to open it so I could slide another little card inside it. I then meticulously cut out a piece of paper to back the envelope because I thought for sure you’d be able to see “inside” it (basically behind it to the panel underneath) and for some reason I just could NOT let that happen. As you can see, it made very little difference. 🙂
The background panel is dark pink polka dot. I didn’t use a die to cut it out, just trimmed it down to standard A2 size (4.25″ x 5.5″), but I did again use the Blueprints scalloped stitched rectangle to cut out the main piece of paper with the rose accent. I thought it was so pretty and wanted to make it a feature of the card front.
I trimmed out the Feb 14 from another sentiment square, put glue on the back, and slipped it inside the envelope. The kit came with these adorable felt hearts with glitter and the gold-edged heart stickers, so I grabbed one of each and put them on. I then grabbed that gold glitter heart on a sheet of scrapbook embellishments I bought at Michaels eons ago. I added two little jewels and called it a day.
I really like how both these cards turned out. Probably the longest thing I had to wait on was the Glossy Accents on the first card. Other than that, they were quick to put together.
Happy Valentine’s Day!
P.S. I’ve created a Facebook page. https://www.facebook.com/craftyasblog/
