 In future posts, I’ll include process photos for making a card or mini album. I didn’t think of taking process photos this time, but I thought I’d describe what I did and show you the finished product.
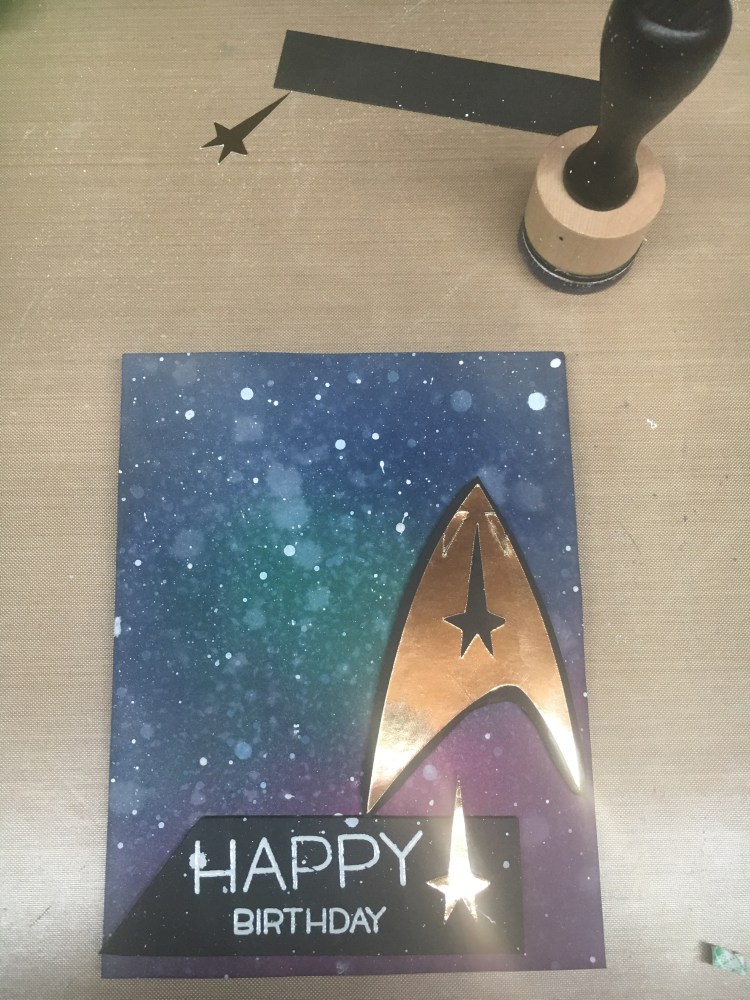
This was a Star Trek™ themed birthday card for a friend of mine. I’ll share my mistakes (not many) so you know how to avoid repeating them.
Equipment Used:
Tim Holtz Distress Inks in Chipped Sapphire, Black Soot, Mowed Lawn, and Seedless Preserves
Tim Holtz Distress Mini Ink Blending Tool and Pads
Neenah Solar White 80lb cardstock
Michaels Recollections Brand Black Cardstock
Michaels Recollections Brand 6” Holiday Foil Solids Paper Pad (I couldn’t find the exact paper I used, so here’s a link to something very similar.)
Lawn Fawn Happy Happy Happy Stamp Set
Ranger Embossing Powder in White
Copic Opaque White Acrylic Paint
Ranger Multi Medium Matte Adhesive
Tombow Permanent Tape Adhesive
The Idea
My friend is a huge Star Trek fan and I wanted to make him a card that played on that. I had an idea of making a galaxy-style background and including the Federation insignia on it in some fashion.
Did you know there is not one single company that makes geeky-themed stamping products? Someone get on that. Geeks would appreciate it. I’m giving this one away for free.
What I Did:
What I ended up doing is finding a simple drawing of the insignia on Google Images and downloading it into Silhouette Studio. I then used the Tools to trace the outline and cut it out on my Silhouette on gold mirror cardstock. I’m still learning this process so I’d guess my future will involved many YouTube videos. YouTube will save me. I attached the insignia to black cardstock with Multi Medium Matte Adhesive and fussy cut it out to leave a border.
Every month the Scrapping for Less card kit includes some sheets of Neenah white cardstock and taking a tip from Tina at Cards & Coffee Time, I had cut one of the sheets into quarters to use for stamping. Mistake #1: I decided that since I already had the cardstock cut own, I would just do my galaxy ink blending on one of those quarters. It wasn’t terrible, but it didn’t go as planned. To start, the inks didn’t blend that well. Then, when I tried to blend the corners, I kept bending one of them badly. Finally, before I even got to spraying the paper to distress it, it was warping due to the amount of ink. So, if I decide to do this card again, I will definitely use watercolor paper.
I wanted to make the galaxy background complete with stars. I started by using my Distress Sprayer to activate the ink. I then decided to use the little jar of Copic Opaque White that I have to enhance the star field, as they say. (Nobody says that.) Mistake #2: I have seen this splatter technique a million times. Amy Rysavy from Prairie Paper & Ink is a pro and does it so well to create stars. What I should have paid better attention to is how much water she adds to the paint. I used my water pen to add what I thought was just a few drops but was really too much water. When I started to splatter my card, two things happened. One, it just reactivated the ink and two, the drops that did show up were very milky looking and didn’t look much like stars. So, I did it again with less water and a better outcome. I then went back through a third time with the Opaque White and no water. It turned out pretty darn cool.
Next, I decided to heat emboss the Happy Birthday sentiment on some black cardstock with white embossing powder. It turned out alright but wasn’t great, so I decided to do some splatter on that too, and it looks really cool. I trimmed it down at an angle on the left edge. I attached the background to a dark blue cardstock that came in the January Scrapping for Less card kit using black craft foam. I then popped up the insignia and sentiment on foam tape and adhered them to the background. All in all, it was a fairly easy project and it turned out nice. My friend really liked it and that was the real goal.
